
Something of an abnormal post here, for a TALK episode that will follow over the next few days...
Today we're looking at the Battle of Gallipoli, this is the place to find all the photos and pics from the trip to Gallipoli that I mentioned in the TALK episode you have hopefully listened to already (ETA on the episode is 28/52015), so I hope you'll have a gander at these photos here, and perhaps get a better feel for what happened this time 100 years ago in the process.
First of all, the facts. The Ottoman Empire entered the war against the allies in early November 1914, after weeks of wrangling on both sides. Following its clear position, the question then was how to deal with this strategically placed, yet somewhat 'sick' new enemy in the Central Powers camp. For some in the British camp, the idea emerged of an ambitious plan to knock the Ottomans out of the war and then drive south from its captured territories to Germany.
To counter this, Germany had to invest yet more men and materials into the flagging empire to ensure that its weak spots could withstand the kind of offensives that the allies were planning. Both sides worked at a furious pace, but it wasn't until early 1915 that the idea of attacking Turkey was seriously considered, mainly because, in the allied camp, the Western Front of Flanders was still the main event, and the French government didn't under any circumstances want British or indeed French soldiers moved away from the front and tasked with some barely conceived, harebrained scheme on the other side of Europe. Opinions began to shift with the onset of deadlock and trench warfare in the west though, as trenches from the Swiss border to the sea were established after the First Battle of Ypres in late November 1914, and from that point on the objective was to punch a hole in the enemy's defences that would end such a stagnation of military affairs.
So, the attention was turned to the Ottoman Empire- more specifically, its critical waterway known as the Dardanelles. The plan being to sail up the Straits and attack Constantinople. If it sounded too easy, that's because it was, but in November 1914 a small engagement by the Royal Navy had knocked out a large fort at the entrance. The event was celebrated by command, but it had the double negative effect of both lulling Britain into a false sense of security and demonstrating to the Turks that a LOT of work had to be done where their defences were concerned. So, over the following weeks the Turks set to work, and with German aid had established a formidable series of defences along the entrance to the Dardanelles, while the allies- secure in the belief that the endeavour would not be overtly taxing- grossly underestimated the gravity of what was about to face them. When the naval attack failed, and the allies lost 6 vessels to the Turkish shore guns, the decision was made to call off the attack. Already, pressure was on Sir Winston Churchill, a principle architect of the plan, and David Lloyd George, a major advocate of the idea, to show results, and the decision was made to capture the peninsula first, and then bring the force of the navy to bear once the guns were forcibly silenced.
For Sir Ian Hamilton, commander of the allies forces about to take their places and invade the Gallipoli Peninsula, his was a task filled with uncertainty. The best information about the peninsula came from outdated French made maps sourced from the Crimean Wars over 50 years before, while secrecy was not watertight and Ian even held an interview with an Egyptian newspaper over the necessity of a landing before the campaign began, as if to wave a giant flag in the face of Liman von Sanders and warn the Turks of their impending arrival. As if he hadn't had enough time to prepare the region already for just such a campaign as the allies were planning, von Sanders now had proof from the horse's mouth that these very defences would soon be put to the test. For Sir Ian Hamilton though, such concerns as predictability or preparation did not seem within his vocabulary. A buzzsaw awaited those he commanded as April neared its end and soldiers massed in eager expectation just off the Straits on the island of Lemnos.
The major plan involved landings at Cape Helles, the southern end of the peninsula. These were to be undertaken by British and Irish soldiers of the 29th Division. Their objective was to storm ashore and seize the high ground- a tactic that will become familiar in the campaign. The Cape Helles landing area stretched across the length of the tip, and so was divided into numerous beaches;
S, V, W, X and Y, with V and W constituting the 'main event' of the landings in the region, and the others designed to provide support. However, once they had landed at dawn on 24th April, it became clear that the plan was flawed. The limited opposition faced by those that landed on all beaches other than V and W meant that the latter two landings lagged behind what were meant to be diversions.
And some other miscellaneous photos of the French cemetery, the Turkish monument etc.


Today we're looking at the Battle of Gallipoli, this is the place to find all the photos and pics from the trip to Gallipoli that I mentioned in the TALK episode you have hopefully listened to already (ETA on the episode is 28/52015), so I hope you'll have a gander at these photos here, and perhaps get a better feel for what happened this time 100 years ago in the process.
Ottoman Empire over the years 

First of all, the facts. The Ottoman Empire entered the war against the allies in early November 1914, after weeks of wrangling on both sides. Following its clear position, the question then was how to deal with this strategically placed, yet somewhat 'sick' new enemy in the Central Powers camp. For some in the British camp, the idea emerged of an ambitious plan to knock the Ottomans out of the war and then drive south from its captured territories to Germany.
View of the peninsula from satellite; note the narrowness of the waterway and thus its critical strategic location. The southern, European facing side was where most action occurred.

To counter this, Germany had to invest yet more men and materials into the flagging empire to ensure that its weak spots could withstand the kind of offensives that the allies were planning. Both sides worked at a furious pace, but it wasn't until early 1915 that the idea of attacking Turkey was seriously considered, mainly because, in the allied camp, the Western Front of Flanders was still the main event, and the French government didn't under any circumstances want British or indeed French soldiers moved away from the front and tasked with some barely conceived, harebrained scheme on the other side of Europe. Opinions began to shift with the onset of deadlock and trench warfare in the west though, as trenches from the Swiss border to the sea were established after the First Battle of Ypres in late November 1914, and from that point on the objective was to punch a hole in the enemy's defences that would end such a stagnation of military affairs.
Hindenburg at Tannenburg, the greatest Russian defeat in living memory, late August 1914.

Devastation left behind following the First Battle of Ypres, November 1914.

Stabilisation of the fronts: the red line denotes the positions of the trench system that served as the de facto limits of success for both sides in early 1915. The impetus for both sides was thus breaking the deadlock, and the allies looked to Germany's newest ally to achieve this.

So, the attention was turned to the Ottoman Empire- more specifically, its critical waterway known as the Dardanelles. The plan being to sail up the Straits and attack Constantinople. If it sounded too easy, that's because it was, but in November 1914 a small engagement by the Royal Navy had knocked out a large fort at the entrance. The event was celebrated by command, but it had the double negative effect of both lulling Britain into a false sense of security and demonstrating to the Turks that a LOT of work had to be done where their defences were concerned. So, over the following weeks the Turks set to work, and with German aid had established a formidable series of defences along the entrance to the Dardanelles, while the allies- secure in the belief that the endeavour would not be overtly taxing- grossly underestimated the gravity of what was about to face them. When the naval attack failed, and the allies lost 6 vessels to the Turkish shore guns, the decision was made to call off the attack. Already, pressure was on Sir Winston Churchill, a principle architect of the plan, and David Lloyd George, a major advocate of the idea, to show results, and the decision was made to capture the peninsula first, and then bring the force of the navy to bear once the guns were forcibly silenced.
Sir Ian Hamilton, the man tasked with commanding the allies and achieving his objectives at Gallipoli. He, like many of his superiors, has a lot to answer for.

General Liman Von Sanders, Germany's deadliest import where the allies were concerned. In terms of bolstering the Turks and providing them with much needed advice and assistance, von Sanders' role in the Gallipoli campaign is highly underrated and deserves to be re-examined.

Lieutenant-General William 'Birdy' Birdwood, commander of the ANZAC forces. Though born in India and somewhat foreign to the ANZACs he commanded, most grew fond of him in their time in Gallipoli. 
For Sir Ian Hamilton, commander of the allies forces about to take their places and invade the Gallipoli Peninsula, his was a task filled with uncertainty. The best information about the peninsula came from outdated French made maps sourced from the Crimean Wars over 50 years before, while secrecy was not watertight and Ian even held an interview with an Egyptian newspaper over the necessity of a landing before the campaign began, as if to wave a giant flag in the face of Liman von Sanders and warn the Turks of their impending arrival. As if he hadn't had enough time to prepare the region already for just such a campaign as the allies were planning, von Sanders now had proof from the horse's mouth that these very defences would soon be put to the test. For Sir Ian Hamilton though, such concerns as predictability or preparation did not seem within his vocabulary. A buzzsaw awaited those he commanded as April neared its end and soldiers massed in eager expectation just off the Straits on the island of Lemnos.
The major plan involved landings at Cape Helles, the southern end of the peninsula. These were to be undertaken by British and Irish soldiers of the 29th Division. Their objective was to storm ashore and seize the high ground- a tactic that will become familiar in the campaign. The Cape Helles landing area stretched across the length of the tip, and so was divided into numerous beaches;
S, V, W, X and Y, with V and W constituting the 'main event' of the landings in the region, and the others designed to provide support. However, once they had landed at dawn on 24th April, it became clear that the plan was flawed. The limited opposition faced by those that landed on all beaches other than V and W meant that the latter two landings lagged behind what were meant to be diversions.
The planned landings at Cape Helles, note W and V at the southermost end of the peninsula.

Detailed map of the landings and the objectives. Note how apparently close everything is. Sometimes we forget that metres separated the men from the enemy and their mission, not miles, and yet it was no easier a task because of this. Formidable defences at V and W beaches prevented much progress, while at S beach the objectives were completed within a few hours.

Some critical commanders had been killed during the Cape Helles landings, which further compromised the venture. Reinforcements were diverted to V beach in an attempt to force the area, but the task was far too great. Names of objectives like Hill 138 and Hill 141 would become the bane of the soldiers, who simply hadn't been prepared for what lay ahead. The Turks were entrenched, and in some cases, to ensure the element of 'surprise', no preliminary bombardment took place to cover the British landings, the result was carnage. In many ways it's hard to imagine the reality of what faced those that landed at V beach, so the best way is to show you the photos I took of the area. These are the first batch of the photos I took, having been in Turkey from 10-14th May 2015; these ones are of the Cape Helles memorial site:
Cape Helles Memorial Site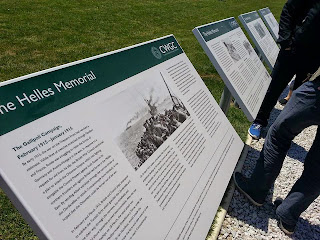

Monument, literally ten minutes walk from V Beach, with stunning surrounding views

Close up, each side had a different dedication

Names, names and more names surround the walls both inside and outside the monument, denoting the butcher's bill for the Cape Helles landings. Not a Twamley in sight, unless I missed one. For a few strange moments I felt unusually disappointed, until I realised exactly what a Twamley on the wall would have meant- that he would have died just as pointlessly as every other name here.

Stunning views in all directions, since we're literally on the tip of the Peninsula.

Beautiful sunshine and the coast of Turkey proper in the distance. Note also the ruins of the fort; that was the fort which blew up after the allied direct hit in November 1914. It essentially guards the entrance to the Dardanelles waterway. Upon landing here the 29th division was met with fire from the coast in the distance as well as from this hill that I took the picture from.

This is the land atop the cliffs that the Turks would have ran across on V Beach. It felt strangely eerie to be in this place, where 100 years before men would have fought for their lives.

Below is V Beach itself. Even now it's hard to believe it was so beautiful, considering the absolute hell that the whole region meant for so many men. Note how people were able to just casually walk up its edge- a task impossible for men just like these folks in the picture 100 years before.

The very same trenches atop V Beach that would have inhabited the defending Turks

This is the view that would have greeted the 29th division as they landed on the beach; steep cliffs impossible to scale from the sea, and granting the defender all the advantages in the world. There was very little in the way of cover where we were standing, and I can only imagine the fear that would have gripped men just like me once they realised the gravity of their task.

Perhaps because of the task's impossibility, it's not surprising to find a cemetery so close to the actual beach where so many men would have landed. Within were buried the remnants of the 29th division of Brits and Irish, an whoever else was unfortunate enough to have to support them. At least 600 men are estimated to be buried here, but some records put it at 800.

Another view of the cliffs that would be scaled by the 29th; the entrance to the cemetery on the right

The entire graveyard was pristine. Birds were singing and the sun beamed down, it was almost possible to forget that 100 years ago, this very ground was the last place of rest for so many as the battle waged overhead.

Another view of the cemetery on V Beach
This was the moment I almost cried. Having felt strangely emotional up to this point, seeing this grave among the others, I read that Mr J. Kiernan from the Royal Dublin Fusiliers, at 21 years old, had died at this spot. It wasn't the fact that he seemed so like me, it was the fact that this happened 100 years ago to the day that I was looking at this grave- that really brought it home. I knelt down and said a small prayer, not really sure what I was praying for, but just in awe of the fact that here, on 11th May 2015 I was able to see J. Kiernan and that I also had a chance to pay my respects.

And some other miscellaneous photos of the French cemetery, the Turkish monument etc.
The French cemetery

We counted at least 3,000 graves 
Stunning white monument; the beauty of it all suggests that it won't ever be forgotten, yet the French contribution is very rarely discussed these days

The major Turkish monument on the primary plateau. Note the line of flags where my friend tried to get a better look and had a whistle blown at him to clear off; the Turks take their monument very seriously

This is the sight that greets you as you walk to the primary plateau above

Here is the mural that would be directly behind you in the first photo. Once again, Mustafa Kemal Attaturk takes center stage, and not for the last time


The 57th Memorial Monument, dedicated to the memory of that division who suffered catastrophic losses during the Gallipoli Campaign. It was this division that was the first to answer the call to defend their homeland against the invading ANZACs at Anzac Cove, and the unit who Attaturk is supposed to have said 'I do not order you to fight, I order you to die'.

Old Man Monument, so-called after its depiction of the last surviving soldier from Gallipoli, Hüseyin Kaçmaz. Also depicted is his granddaughter, who regularly visited the site with him. In 1993, he met with the last surviving ANZAC soldier, a New Zealander, and the two shook hands. These two men, who would have both been in their early 100's, were an unforgettable symbol of the past, and yet they made their peace with that past, setting an example for the rest of the world in the process.

Another statue of Attaturk, this one a tad more controversial, since it sits beside the New Zealand monument (not pictured here, it's behind the back of photographer). When the NZ monument was commissioned, all seemed well and good, yet a few years later the Turkish government had inexplicably erected their own status of Attaturk right beside theirs. Thanks to the Danish students accompanying us on the trip for filling me in on those details. The fellows posing for the picture are the graduates of the Turkish navy, or so we reckoned anyway. Note how seriously the statue of Attaturk is taken; we were dared to jump in and photobomb them, but we weren't that brave... 

Unfortunately, Cape Helles was not the only landing site. Where would Gallipoli be without ANZAC cove and everything awful that landing suggested? Anzac Cove was designed to support the landing at Cape Helles by cutting the Ottoman communications in the hills behind the Turks. Once in place, the Anzacs were to hold the high ground and ready themselves to link up with the successful Cape Helles landings, once the latter had cleared away the opposition with relative ease, because don't forget chaps, you'll be landing relatively unopposed. The navy will blow Jonny Turk to pieces, and even if not, just give him a good run with the bayonet and he'll scatter! The reality, of course, was a poles apart from what the Anzacs were told to expect, and as a result they walked into yet another buzzsaw.
What follows are further photos of Anzac Cove, its beaches, cemeteries and related images, taken on 12 May 2015;
Next are the photos I took of Shrapnel Valley, which during the times of the landings 100 years ago looked like this;

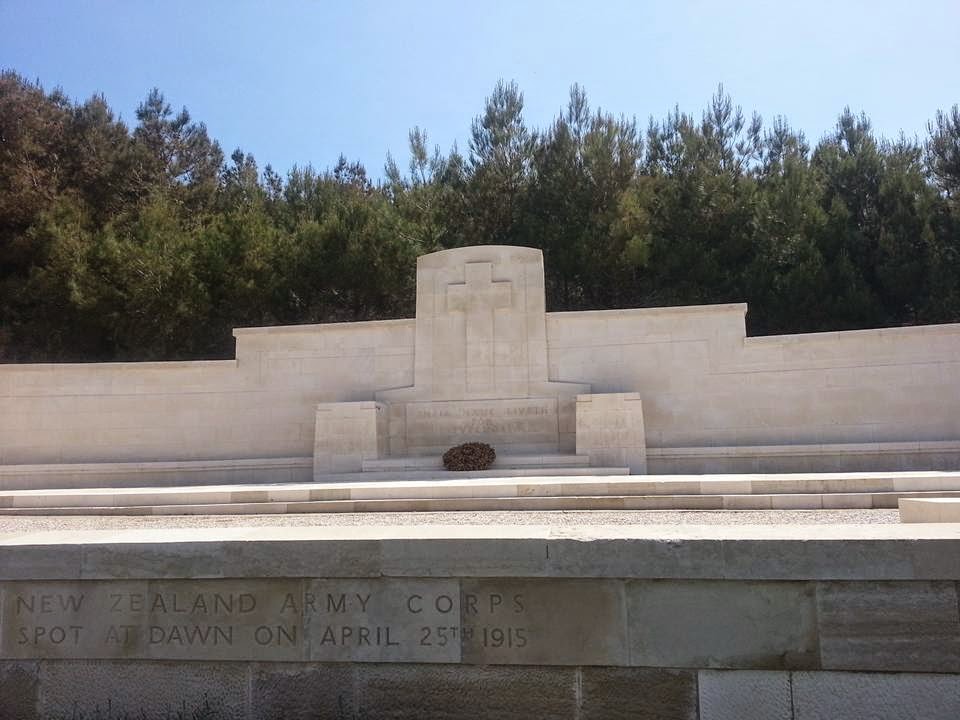
Nowadays, it's a pristine cemetery and grounds, with freshly cut green grass, marble white headstones and the customary dedication at the leading monument which reads 'Their Name Liveth For Evermore'


We next visited Plugge's Plateau (pronounced 'Pluggy'), which served as a major base of operations for the Anzacs after it was captured within a few hours of the landing.
We then visited the cemetery at Ari Burnu, the name once given to Anzac Cove, before the Turkish Government officially renamed it after the Anzacs in 1985. Its the most impressive site in the region, and was once the area where the Anzac Day Dawn Service was held, until it was moved in 2000 to a an even larger area that we'll encounter a bit later in this blog.


We also visited Lone Pine Cemetery, where the ANZAC ceremony a few months ago had been held. Our guide told us that only two weeks before we arrived, 10,000 people had flocked to the area to commemorate ANZAC day 100 years on. It was a truly breathtaking experience.
Even after all that had been lost, the allies had not given up on the idea of Gallipoli. A grand offensive was planned for August, whereby the allies hoped to attack on all fronts and mount a landing at Suvla Bay, a little bit north of Anzac Cove. The entire operation, unfortunately, was filled with breathtaking carelessness and criminal stupidity on the allied side, as generals with no grasp of the situation repeatedly send wave after wave of young men to their deaths in a hopeless quest to dislodge the advantaged Turk. This was the Battle of the Nek, so named after the bottleneck that the ridge appeared to take the shape of. One war correspondent, Charles Bean, compared it to 'attacking a frying pan from the handle'. It was madness, and it was meant only as part of another objective, yet the original accompanying objective was never completed. When word came that this attack was to go ahead anyway, many believed it was a death sentence. It even got off to an awful start, with the preliminary bombardment finishing 7 minutes earlier than it was meant to.
This meant that, rather than facing at least semi-stunned or lesser prepared defenders when the time to go over the top came, the allies would face prepared, well-dug in and incredulous Turkish defenders, who couldn't believe that their enemy would attack at such a disadvantage. The guns, not just of the defenders here, but of other Turks placed a few hundred meters away on nearby hills, were able to rain down murderous fire from the outset. When the first wave were all wiped out, the second wave went ahead anyway, as did the the third. There was definite protest, to the extent that only part of the 4th wave went ahead, but still, it was nowhere near what should have been done. The command were so blatantly detached from the reality on the ground that condemning their actions doesn't come close to justice. They threw men to their deaths with a psychotic, despicable sense of laxness that in any other place, at any other time, they would be murderers. Yet here, on this piece of land, they remained in control of it all.
It makes me so angry to read and hear about, and there is a real sense of tragedy in this cemetery;
What follows are additional photos I encountered/took myself;
So yes, that's going to do I think. I know this has been something of a long-winded, photo packed post, and I'm sure the episode will be something similar, knowing myself and Sean! I feel like it was worth it though, like this is a story that needs to be told. If you can care about Gallipoli, or at least don't think of it as some event unimportant or uninteresting to you, then I have accomplished something here. Trust me when I say, having visited these place, Gallipoli is a story that needs to be told, and it is a story just as relevant today as it was a century ago. It is about youth, naivety, grief, loss, sacrifice, terror, death and tragedy. It is the place that a dominion became a nation. It is also a place forever associated with failure, and symbolic of what happens when you underestimate your enemy. The real tragedy in my view is that the allies would do it all again the following July. With just as little preparation, with just as little care for men's lives and with just as little 'success', the Somme eclipsed Gallipoli for all the wrong reasons, and claimed the lives of men whose only crime was to volunteer (or be conscripted) into an army which they believed would use their life, not waste it.
I shudder to think of what the youth of today would do, if faced with a situation like that today. So many of the graves I saw contained the names of men whose lives had ended before they had even reached the stage of mine. I, at 23, was older than most of the casualties I came across. Yet, having seen what I've seen, I know deep down that I would never have it within me to go over the top as they did. I am sincerely thankful that nobody in our generation will ever have to. I, personally want those I love; my friends, family and other half, to have more to remember me by than, as that ringing epitaph said my 'photo on the wall'.
Thanksssssssssss for reading history friends! Thanks also to Lia Brazil for letting me steal her photos (my phone had died) and to this website for their great advice and pics:
http://www.gallipoli.gov.au/explore-northern-war-cemeteries/cemeteries-and-memorials-of-anzac.php
Zack
The landings at Anzac Cove, with Pugg's Plateau serving as a major initial objective, and the higher hills in the background serving as the further objectives. Nobody stopped to imagine that the Turks would expect a landing, or that they would realise the value of the high ground.

The actual progress that was made, compared with the objective in the distance.
Anzac Cove, angle 1

Anzac Cove, angle 2. In the distance is Suvla Bay, another landing that consumed countless lives

Anzac Cove, angle 3. Still I am struck by the beauty of it all; if I didn't know what had happened here, I'd swear this was a holiday resort. The sun was very strong, and that was only standing still, so it doesn't take much imagination to suppose that the men that fought here would have had huge problems with dehydration and sunstroke, not to mention disease.

The infamous ridges of Anzac Cove, only now do they appear so incredibly daunting, seeing them in real life is even more incredible. How the men managed to scale this is beyond me; how they looked at it and thought to themselves that it was a task within the realm of possibility is beyond me also

Another angle of the ridges that would have given invaluable cover to the defending Turks, with the Anzacs having to rush up the space in between, facing fire on both sides as they did so.

Anzac Cove, angle 4. The birds were signing so loudly that at some stages we couldn't hear our guide. I'd like to think that the birds somehow knew what had happened here 100 years before. That they knew the pain and anguish men in this area once went through, and that to compensate, they sing extra loudly, to try and cover up what was once hell on earth for so many, and a meat grinder for so many others. I got the sense that, having endured what it had a century before, there was no pain left, and that now there was only this startling beauty

Looking down south from where we were standing atop Anzac Cove, so in other words having turned 180 degrees from the above picture. That crop of grey hair belongs to our lovely tour guide, who had lived in the region and given tours just like ours for decades. It is such obviously beautiful scenery, and even now is treated as almost holy ground. To think that 100 years before it would have been a hive of activity, as the allies attempted to supply their Anzac brethren now ashore.

Next are the photos I took of Shrapnel Valley, which during the times of the landings 100 years ago looked like this;

Nowadays, it's a pristine cemetery and grounds, with freshly cut green grass, marble white headstones and the customary dedication at the leading monument which reads 'Their Name Liveth For Evermore'
Shrapnel Valley Cemetery and Memorial Grounds


Plugge's Plateau, and the view of Anzac Cove that I depicted earlier in this blog, were accessed by following the remnants of the trenches that way and up a seriously steep hill.


It's difficult not to feel a tad emotional about this one; his parents bringing this slab of rock from so many miles away in Oz, just so their late son could be laid to rest next to his native ground. I can only imagine how difficult that journey must have been for the family, I can only hope it was therapeutic to arrive here at last and put it here in its rightful place. 

This epitaph was especially striking for me. Some tried to find significance in the loss by emphasising honour, duty or respect for one's mates. This one is heart wrenchingly tragic in its truths. All his friends would have, following this loss, was his picture on the wall, because friends, despite the honour and heroism involved, could not take pride in this man's sacrifice. They didn't want a hero, they just wanted their friend back, and now they'd never see him again.


I tried to get a feel for what this place once was by taking a good few shots of the surrounding countryside. Note the hills on this side, as well as the other sides. No wonder it was named Shrapnel Valley, the entire region was a funnel for soldiers to walk through and somehow survive, while being attacked on all sides by bombs, heavy machine guns and explosive shells that inflicted such horrible wounds as only shrapnel could.

Hills surround the cemetery...

Headstones line the grounds

He died for his country's honour, an interesting concept when one considers the grief stricken tragic plea of the other headstone. It just goes to show that people will try to find significance in the loss in a number of ways; some will never accept that the loss was worth it, others will cling desperately to the idea that it was. The poor people that had to endure this.

We next visited Plugge's Plateau (pronounced 'Pluggy'), which served as a major base of operations for the Anzacs after it was captured within a few hours of the landing.
How it looked back then, note the tents strewn across the so-called command center where Colonel Arthur Plugge, commander of the New Zealand Auckland Battalion established his HQ

Plugge's is the smallest of the cemeteries in the region, dedicated to only 21 Anzac deaths

Despite this, it's no less important than the others, nor is it any less beautiful. We visited it on our way to take the numerous photos of Anzac Cove.

We then visited the cemetery at Ari Burnu, the name once given to Anzac Cove, before the Turkish Government officially renamed it after the Anzacs in 1985. Its the most impressive site in the region, and was once the area where the Anzac Day Dawn Service was held, until it was moved in 2000 to a an even larger area that we'll encounter a bit later in this blog.
ANZAC resting place

The striking white monuments that are the signature of the memorial sites here
The first of 7 graves chosen for their character


So simple; private yet public, short yet sweet. Epitaphs like these emphasise the human element that is so critical to preserve, so that these names do not become mere statistics


The only Jewish headstone I encountered in my travels

We also visited Lone Pine Cemetery, where the ANZAC ceremony a few months ago had been held. Our guide told us that only two weeks before we arrived, 10,000 people had flocked to the area to commemorate ANZAC day 100 years on. It was a truly breathtaking experience.
Lone Pine Cemetery, 1920.

21 years after the battle; the first ceremony to take place on the new grounds, Lone Pine, 1936. Recently constructed is the Monument to the Missing, a beautiful idea that ensures even those who have not found a final resting place can still have their collective memory respected here.

Lone Pine today, and no that is not the pine it is named after (apparently many people presume that it is); that tree no longer stands, but it is a nice dedication nonetheless.

Lone Pine view from the step up, with back facing the monument.

Inscription of the wall down from the monument itself. The inscription reads 'To the Glory of God and in lasting memory of 3,268 Australian soldiers who fought on Gallipoli in 1915 and have no known graves, and 456 New Zealand soldiers whose names are not recorded in other areas of the Peninsula but who fell in the Anzac Area and have no known graves; and also of 960 Australians and 252 New Zealanders who, fighting on Gallipoli in 1915, incurred mortal wounds or sickness and found burial at Sea.

Within the open door of the Monument to the Missing were a countless artifacts dedicated at the time of the ANZAC ceremony weeks before. Some contained pleas to distant relatives, some calls to late ancestors, others thanked them for their sacrifice, and hoped that they could be at peace.

Even after all that had been lost, the allies had not given up on the idea of Gallipoli. A grand offensive was planned for August, whereby the allies hoped to attack on all fronts and mount a landing at Suvla Bay, a little bit north of Anzac Cove. The entire operation, unfortunately, was filled with breathtaking carelessness and criminal stupidity on the allied side, as generals with no grasp of the situation repeatedly send wave after wave of young men to their deaths in a hopeless quest to dislodge the advantaged Turk. This was the Battle of the Nek, so named after the bottleneck that the ridge appeared to take the shape of. One war correspondent, Charles Bean, compared it to 'attacking a frying pan from the handle'. It was madness, and it was meant only as part of another objective, yet the original accompanying objective was never completed. When word came that this attack was to go ahead anyway, many believed it was a death sentence. It even got off to an awful start, with the preliminary bombardment finishing 7 minutes earlier than it was meant to.
General Sir Alexander Godley, the man in charge of the offensives at the battle of the Nek in early August 1915. Responsible for neglecting his troops, to the extent that he commissioned wave after wave of slaughter at the Battle of the Nek, not to mention elsewhere, Godley would be privately vilified by his troops, yet publicly his career flourished. He would lead the ANZACs again on the Western Front, and in late 1917 would again come under scrutiny for ordering the continuation of the Third Battle of Ypres, also known as Passchendaele. Yet, unfortunately, Godley wasn't the only one doing so, he was part of the cancer of careless within the British Army, he did not invent it or play the sole role in its continuation. He has a lot to answer for, nonetheless, and his name should be among the other controversial ones such as Douglas Haig and Lord Kitchener for what he did at the Battle of the Nek, where the flower of Australia, not to mention many other nations, was trampled upon and slaughtered for no gain whatsoever, save another gleaming memorial
This meant that, rather than facing at least semi-stunned or lesser prepared defenders when the time to go over the top came, the allies would face prepared, well-dug in and incredulous Turkish defenders, who couldn't believe that their enemy would attack at such a disadvantage. The guns, not just of the defenders here, but of other Turks placed a few hundred meters away on nearby hills, were able to rain down murderous fire from the outset. When the first wave were all wiped out, the second wave went ahead anyway, as did the the third. There was definite protest, to the extent that only part of the 4th wave went ahead, but still, it was nowhere near what should have been done. The command were so blatantly detached from the reality on the ground that condemning their actions doesn't come close to justice. They threw men to their deaths with a psychotic, despicable sense of laxness that in any other place, at any other time, they would be murderers. Yet here, on this piece of land, they remained in control of it all.
It makes me so angry to read and hear about, and there is a real sense of tragedy in this cemetery;
Much like everything else in Gallipoli, this cemetery wasn't always so pristine...

Here was the site where Charles Bean, war correspondent for the ANZACs, found the human bones (visible in this photo) of the Battle of the Nek in 1919, and they mercifully led to the creation of a proper cemetery (below under construction) 

Cemetery of the Nek under construction, 1923.

Plaque of dedication to those that fell

Artists' impression of the Nek, 1924
What follows are additional photos I encountered/took myself;
Turkish soldiers, equipped with the latest model of German Maxim gun that proved so devastating
Lancashire Fusiliers on their way to W beach, where most would meet their end. So substantial were their losses that W Beach is often referred to as Lancashire Landing in some histories
French soldiers at Cape Helles
ANZAC soldiers land at Pugge's Plateau
Smashed portion of one of the forts tasked with defending ANZAC Cove

One of the trench systems atop the Nek

Such systems stretched underground, as one side attempted to overtake the other

One of the many demonstrations of what such warfare would have been like 100 years ago, with soldiers sometimes as close as 8 meters to one another's lines. This was taken just before we got the ferry across to Cannakkele, on the Turkish side of the Dardanelles (and where that horse from the film Troy is held) 

Just in case you thought I was lying, here is the horse!

So yes, that's going to do I think. I know this has been something of a long-winded, photo packed post, and I'm sure the episode will be something similar, knowing myself and Sean! I feel like it was worth it though, like this is a story that needs to be told. If you can care about Gallipoli, or at least don't think of it as some event unimportant or uninteresting to you, then I have accomplished something here. Trust me when I say, having visited these place, Gallipoli is a story that needs to be told, and it is a story just as relevant today as it was a century ago. It is about youth, naivety, grief, loss, sacrifice, terror, death and tragedy. It is the place that a dominion became a nation. It is also a place forever associated with failure, and symbolic of what happens when you underestimate your enemy. The real tragedy in my view is that the allies would do it all again the following July. With just as little preparation, with just as little care for men's lives and with just as little 'success', the Somme eclipsed Gallipoli for all the wrong reasons, and claimed the lives of men whose only crime was to volunteer (or be conscripted) into an army which they believed would use their life, not waste it.
The 4 lads in Gallipoli, when we weren't drinking beer, we were here! From left to right is Caelan, Jack, Adam and myself. Good thing the world didn't require us to do what our generation, 100 years ago did... I don't know what would have happened if it had! 

The Irish Gallipoli crew, seated here at the base of the Turkish monument. From left to right Kristina, YanLi, Val, Adam, Liam, Caelan, ME, Dawn, Lia, Jack and our dear leader (and my dissertation supervisor) William Mulligan. Thanks for the fun times folks!

I shudder to think of what the youth of today would do, if faced with a situation like that today. So many of the graves I saw contained the names of men whose lives had ended before they had even reached the stage of mine. I, at 23, was older than most of the casualties I came across. Yet, having seen what I've seen, I know deep down that I would never have it within me to go over the top as they did. I am sincerely thankful that nobody in our generation will ever have to. I, personally want those I love; my friends, family and other half, to have more to remember me by than, as that ringing epitaph said my 'photo on the wall'.
Thanksssssssssss for reading history friends! Thanks also to Lia Brazil for letting me steal her photos (my phone had died) and to this website for their great advice and pics:
http://www.gallipoli.gov.au/explore-northern-war-cemeteries/cemeteries-and-memorials-of-anzac.php
Zack


.jpg)


%2C_Grand_Pensionary_of_Holland%2C_by_Studio_of_Adriaen_Hanneman.jpg)
.jpg)
.jpg)


